[vc_row][vc_column]
Vote for my entry in the TranspArt contest!
[vc_separator style=”blank” padding_top=”20″ padding_bottom=”20″]
Round 3 of the Worbla's TranspArt Contest
[vc_column_text]I crafted Felo’melorn for the third and final round of the
TranspArt Competition put on by Worbla.com.
For the final round we were able to build anything we liked using the materials sent to us, and then make a tutorial about our process. My entry for the previous round– The Sword of Fire and Ice– was surprisingly popular, and I received a lot of questions about how I made it. In particular, people were interested in the hollow blades, and how I made my project glow.
Because of this I wanted to make a project in a similar vein. Since I’m very invested in Blizzard cosplay, and so many of their weapons have a glowy magical blades, I decided to go with something from the World of Warcraft Universe. In honor of Legion — the new expansion that releases in August — I wanted to craft one of the new, super powerful, Artifact Weapons.
I may not have a Mage in game, but I fell in love with Felo’melorn, Pride of the Sunstriders the minute I saw its design. For my build I decided on the blue and gold version (since it comes in several colors).[/vc_column_text][vc_separator style=”blank” padding_top=”20″ padding_bottom=”20″][vc_row_inner][vc_column_inner width=”1/2″]
[vc_column_text]
- 1 Medium Sheet of TranspArt
- 1 Medium Sheet of Worbla‘s Finest Art
- 1 Pair of Heat resistant gloves
- A set of silicone fingertips
- A set of Earth Magnets
- 1 small bottle of Flexbond (I promptly misplaced this, but I had been planning on trying it out anyways, so I bought a medium bottle.)
[/vc_column_text][/vc_column_inner][vc_column_inner width=”1/2″]
[vc_column_text]
- EVA Foam
- Adafruit Neopixel Strip (1/2 a foot)
- Adafruit 3V Trinket Pro
- A Soldering Iron
- 1″ PVC Pipe
- Airbrush & Airbrush Paint
For specifics on my general materials, check out my Materials & Tools Page.[/vc_column_text][/vc_column_inner][/vc_row_inner][vc_separator style=”blank” padding_top=”20″ padding_bottom=”20″][vc_single_image image=”2196″ img_size=”large” alignment=”center” style=”vc_box_shadow_3d”][/vc_column][/vc_row][vc_row][vc_column]
[vc_column_text]One of the really nice things about crafting things from World of Warcraft is that there’s a
3D model viewer for every item on Wowhead.com. This allowed me to get some nice screenshots of the sword from a few angles.[/vc_column_text][vc_separator style=”blank” padding_top=”20″ padding_bottom=”20″][vc_single_image image=”2194″ img_size=”large” alignment=”center”][vc_separator style=”blank” padding_top=”20″ padding_bottom=”20″][vc_column_text]I then took the screen shots into Adobe Illustrator to make vector blueprints (
Inkscape is a free alternative). This allows me to scale it, and print it out as templates for my foam and transpArt shapes.[/vc_column_text][vc_separator style=”blank” padding_top=”20″ padding_bottom=”20″][vc_single_image image=”2131″ img_size=”large” alignment=”center”][vc_separator style=”blank” padding_top=”20″ padding_bottom=”20″][vc_separator style=”blank” padding_top=”5″ padding_bottom=”5″]
Free Felo'melorn Blueprint
You too can make your very own Fire Mage Artifact! I’ve made my blueprint for this project a free download in my store.
[vc_separator style=”blank” padding_top=”5″ padding_bottom=”5″][vc_separator style=”blank” padding_top=”20″ padding_bottom=”20″][/vc_column][/vc_row][vc_row][vc_column]
[vc_column_text]I made a video tutorial showcasing my method of making hollow TranspArt blades using a soldering iron to ‘weld’ the edges together.[/vc_column_text][vc_video link=”https://www.youtube.com/watch?v=DA_gMW_ZGko&feature=youtu.be”][vc_separator style=”blank” padding_top=”20″ padding_bottom=”20″][vc_row_inner][vc_column_inner width=”2/3″][vc_column_text]You can also fill these blades with resin, colorful fabric, or cover them in more TranspArt to look like fire; such as I did with my
Sword of Fire and Ice.
There are all sorts of possibilities, and super cool projects you can make with this method![/vc_column_text][/vc_column_inner][vc_column_inner width=”1/3″][vc_single_image image=”1777″ img_size=”medium”][/vc_column_inner][/vc_row_inner][/vc_column][/vc_row][vc_row][vc_column]
[vc_column_text]I use a pretty similar electronics set up for my builds like this. I plan on making a more exhaustive post about arduinos and neopixels and such, but I’ve been so busy that it keeps getting put off. (Soon™)
Anyways I hope that a little of what I show here can help out.[/vc_column_text][vc_separator style=”blank” padding_top=”20″ padding_bottom=”20″][vc_single_image image=”2141″ img_size=”large” alignment=”center”][vc_separator style=”blank” padding_top=”20″ padding_bottom=”20″][vc_column_text]So this is the blade after it was heat welded together. I generally like to run my strip of Neopixels (programmable LEDs in a chain) down the spine of my blade so that it points down into the more interesting areas. Then I superglue it down so it doesn’t move around.[/vc_column_text][vc_separator style=”blank” padding_top=”20″ padding_bottom=”20″][vc_single_image image=”2137″ img_size=”large” alignment=”center”][vc_separator style=”blank” padding_top=”20″ padding_bottom=”20″][vc_column_text]This is my basic setup: an Adafruit 3V Pro Trinket (my arduino), and a JST switch that gets connected to my battery. The switch input (+) from the JST switch goes into the 3V pin on the Pro Trinket as well as connects to the wire (colored red) that will get soldered the positive pad on your Neopixel Strip. The ground (-) from the JST switch goes into the G pin (ground) on the Pro Trinket as well as connects to the wire (colored black) that will get soldered the negative pad on the Neopixels. The third wire comes out of pin 6 on the Pro Trinket, and will be soldered into the Data In pad on the Neopixels.[/vc_column_text][vc_separator style=”blank” padding_top=”20″ padding_bottom=”20″][vc_single_image image=”2138″ img_size=”large” alignment=”center”][vc_separator style=”blank” padding_top=”20″ padding_bottom=”20″][vc_column_text]This is your Neopixel strip. You want to solder to the end that has the arrows going away from you because that is the direction of data flow. In this photo the top pad is 5V (+) — it works with 3V, but is dimmer. The middle pad is the Data In pad which carries the signal that tells your lights to do things. The bottom pad is Ground (-).[/vc_column_text][vc_separator style=”blank” padding_top=”20″ padding_bottom=”20″][vc_single_image image=”2140″ img_size=”large” alignment=”center”][vc_separator style=”blank” padding_top=”20″ padding_bottom=”20″][vc_column_text]This is what it looks like running the basic Strand Test that is available in the Adafruit Arduino IDE. I tried diffusing the light with some fabric, but it didn’t work as well as I wanted.
The following drop down contains the code I used in the final version of Felo’melorn.[/vc_column_text][vc_separator style=”blank” padding_top=”20″ padding_bottom=”20″][vc_accordion active_tab=”false” collapsible=”yes”][vc_accordion_tab title=”Code for Flickering Fire”][vc_column_text]This was written for an Adafruit Pro Trinket using the Adafruit Arduino IDE in C++, so just to be safe I can’t guarantee it will work for you.[/vc_column_text]
[vc_column_text]#include <Adafruit_NeoPixel.h>
const int buttonPin = 18; // the number of the pushbutton pin
const int ledPin = 13; // the number of the LED pin
const int strandPin = 6;
const int neopixelNumber = 60; //[INSERT # OF NEOPIXELS YOU HAVE HERE!]
Adafruit_NeoPixel strip = Adafruit_NeoPixel(neopixelNumber, strandPin, NEO_GRB + NEO_KHZ800);
int mode = 0;
int max_mode = 8;
int lastButton = 1;
long lastMillis = 0;
int brightness = 128;
uint32_t fire_hot = strip.Color(200, 200, 255); // light blue
uint32_t fire_cool = strip.Color(0, 0, 255); // blue
uint32_t lerp(uint32_t color0, uint32_t color1, int alpha);
int highlight = 0;
void setup() {
strip.begin();
strip.show(); // Initialize all pixels to ‘off’
}
void loop() {
fire();
strip.show();
}
void setPixel(int i, uint32_t color) {
int red = (color >> 16) & 0xFF;
int green = (color >> 8) & 0xFF;
int blue = color & 0xFF;
red = (red * brightness) >> 8;
green = (green * brightness) >> 8;
blue = (blue * brightness) >> 8;
strip.setPixelColor(i, strip.Color(red, green, blue));
}
void fire() {
for (int i = 0; i < neopixelNumber; ++i)
ember(i);
}
void ember(int i) {
int alpha = random(257);
uint32_t color = lerp(fire_cool, fire_hot, alpha);
setPixel(i, color);
}
#define _r(color) (((color)>>16)&0xFF)
#define _g(color) (((color)>>8)&0xFF)
#define _b(color) ((color)&0xFF)
uint32_t lerp(uint32_t color0, uint32_t color1, int alpha) {
int r = (_r(color0) * (256-alpha) + _r(color1) * alpha) >> 8;
int g = (_g(color0) * (256-alpha) + _g(color1) * alpha) >> 8;
int b = (_b(color0) * (256-alpha) + _b(color1) * alpha) >> 8;
return strip.Color(r, g, b);
}[/vc_column_text][/vc_accordion_tab][/vc_accordion][vc_separator style=”blank” padding_top=”20″ padding_bottom=”20″][vc_row_inner][vc_column_inner width=”1/2″][vc_single_image image=”2145″ img_size=”large” alignment=”center”][vc_separator style=”blank” padding_top=”5″ padding_bottom=”5″][vc_column_text]After I airbrushed the blade blue the LEDs diffused pretty nicely, so I was happy with how it turned out.
The electronics and battery were hidden on the inside of the PVC handle, and the pommel pulls off so I can get at them.[/vc_column_text][vc_separator style=”blank” padding_top=”20″ padding_bottom=”20″][/vc_column_inner][vc_column_inner width=”1/2″][vc_single_image image=”2126″ img_size=”large” alignment=”center”][vc_separator style=”blank” padding_top=”5″ padding_bottom=”5″][vc_column_text]The final effect looks really good![/vc_column_text][vc_separator style=”blank” padding_top=”20″ padding_bottom=”20″][/vc_column_inner][/vc_row_inner][vc_separator style=”blank” padding_top=”5″ padding_bottom=”5″][vc_separator style=”blank” padding_top=”5″ padding_bottom=”5″][vc_separator style=”blank” padding_top=”20″ padding_bottom=”20″][/vc_column][/vc_row][vc_row][vc_column]
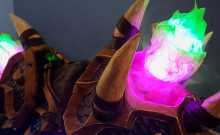
[vc_column_text]Ok. So now we have a glowy blade, now we have to make it into a sword.[/vc_column_text][vc_separator style=”blank” padding_top=”20″ padding_bottom=”20″][vc_row_inner][vc_column_inner width=”1/2″][vc_single_image image=”2144″ img_size=”large” alignment=”center”][vc_separator style=”blank” padding_top=”5″ padding_bottom=”5″][vc_column_text]I used superglue and hot glue to stick each half to the blade. The worbla ‘wings’ were then heated up and squished together around the sides of the transpArt blade.[/vc_column_text][vc_separator style=”blank” padding_top=”20″ padding_bottom=”20″][/vc_column_inner][vc_column_inner width=”1/2″][vc_single_image image=”2147″ img_size=”large” alignment=”center”][vc_separator style=”blank” padding_top=”5″ padding_bottom=”5″][vc_column_text]The reference has the blade and handle float separately, but gravity doesn’t work that way in the real world unfortunately. I tried making a clear piece out of transpArt to connect the two halves, but it wasn’t quite strong enough (and floppy blades are not what I’m after). So I just used regular worbla. This also got wrapped around the PVC handle.[/vc_column_text][vc_separator style=”blank” padding_top=”20″ padding_bottom=”20″][/vc_column_inner][/vc_row_inner][vc_row_inner][vc_column_inner width=”1/2″][vc_single_image image=”2152″ img_size=”large” alignment=”center”][vc_separator style=”blank” padding_top=”5″ padding_bottom=”5″][vc_column_text]I made the decorative hilt the same way as the wings, using my soldering iron to burn designs into the foam.[/vc_column_text][vc_separator style=”blank” padding_top=”20″ padding_bottom=”20″][/vc_column_inner][vc_column_inner width=”1/2″][vc_single_image image=”2153″ img_size=”large” alignment=”center”][vc_separator style=”blank” padding_top=”5″ padding_bottom=”5″][vc_column_text]This also was wrapped in worbla, and I used a tool to press the lines back in.[/vc_column_text][vc_separator style=”blank” padding_top=”20″ padding_bottom=”20″][/vc_column_inner][/vc_row_inner][vc_row_inner][vc_column_inner width=”1/2″][vc_single_image image=”2156″ img_size=”large” alignment=”center”][vc_separator style=”blank” padding_top=”5″ padding_bottom=”5″][vc_column_text]Here’s what it looked like all put together with the detail pieces, and the connecting piece is strong enough to hold the blade.[/vc_column_text][vc_separator style=”blank” padding_top=”20″ padding_bottom=”20″][/vc_column_inner][vc_column_inner width=”1/2″][vc_single_image image=”2157″ img_size=”large” alignment=”center”][vc_separator style=”blank” padding_top=”5″ padding_bottom=”5″][vc_column_text]I wasn’t entirely happy with the seams where the wings came together, so I mixed up some Apoxie Sculpt and smoothed them over. It’s an easy way to get a seamless effect without having to dremel the edges– which can get sort of messy.[/vc_column_text][vc_separator style=”blank” padding_top=”20″ padding_bottom=”20″][/vc_column_inner][/vc_row_inner][vc_row_inner][vc_column_inner width=”1/2″][vc_single_image image=”2142″ img_size=”large” alignment=”center”][vc_separator style=”blank” padding_top=”5″ padding_bottom=”5″][vc_column_text]One of my favorite aspects of the design of this sword is the eagle wings that wrap around the blade. Using my blueprint I cut them out of EVA foam floor mat. I used my soldering iron (you can also use a hot knife) to burn in the decorative channel.[/vc_column_text][vc_separator style=”blank” padding_top=”20″ padding_bottom=”20″][/vc_column_inner][vc_column_inner width=”1/2″][vc_single_image image=”2143″ img_size=”large” alignment=”center”][vc_separator style=”blank” padding_top=”5″ padding_bottom=”5″][vc_column_text]I then covered this with worbla, electing to use the fold-over method to save material since you woudn’t see the underside anyway. You can use sculpting tools to press designs into the worbla, but it works better if the foam already has indents to start with.[/vc_column_text][vc_separator style=”blank” padding_top=”20″ padding_bottom=”20″][/vc_column_inner][/vc_row_inner][vc_separator style=”blank” padding_top=”5″ padding_bottom=”5″][/vc_column][/vc_row][vc_row][vc_column]
[vc_column_text]Naked props never look as good as you want them to, but the paint job is what makes the magic come to life![/vc_column_text][vc_separator style=”blank” padding_top=”20″ padding_bottom=”20″][vc_row_inner][vc_column_inner width=”1/2″][vc_single_image image=”2161″ img_size=”large” alignment=”center”][vc_separator style=”blank” padding_top=”5″ padding_bottom=”5″][vc_column_text]Normally I use 6+ coats of wood glue to seal my WFA projects, but since I had been given Flexbond, I decided to try that out instead since I heard it can make worbla smooth in two or three.[/vc_column_text][vc_separator style=”blank” padding_top=”20″ padding_bottom=”20″][/vc_column_inner][vc_column_inner width=”1/2″][vc_single_image image=”2163″ img_size=”large” alignment=”center”][vc_separator style=”blank” padding_top=”5″ padding_bottom=”5″][vc_column_text]The Flexbond worked pretty well, but unlike wood glue, it isn’t self leveling, so brush strokes were evident even if you were being careful (which becomes an issue with metallic things, oops). I ended up using three coats, but I probably should have gone to four to make things extra smooth.[/vc_column_text][vc_separator style=”blank” padding_top=”20″ padding_bottom=”20″][/vc_column_inner][/vc_row_inner][vc_row_inner][vc_column_inner width=”1/2″][vc_single_image image=”2173″ img_size=”large” alignment=”center”][vc_separator style=”blank” padding_top=”5″ padding_bottom=”5″][vc_column_text]After everything had dried, I base-coated everything with either blue, black, or a yellow gold using my airbrush. From here I like to build up shadows and highlights.[/vc_column_text][vc_separator style=”blank” padding_top=”20″ padding_bottom=”20″][/vc_column_inner][vc_column_inner width=”1/2″][vc_single_image image=”2174″ img_size=”large” alignment=”center”][vc_separator style=”blank” padding_top=”5″ padding_bottom=”5″][vc_column_text]My next step was to add rose gold accents that would add depth– since yellow gold looks super fake and plastic-y by itself.[/vc_column_text][vc_separator style=”blank” padding_top=”20″ padding_bottom=”20″][/vc_column_inner][/vc_row_inner][vc_row_inner][vc_column_inner width=”1/2″][vc_single_image image=”2176″ img_size=”large” alignment=”center”][vc_separator style=”blank” padding_top=”5″ padding_bottom=”5″][vc_column_text]Since the blade was already painted and I didn’t want to get gold on it I like to use scraps of worbla or cardboard to prevent overspray. It’s faster than using masking tape, but I recommend that if you use this method you should be experienced with your airbrush.[/vc_column_text][vc_separator style=”blank” padding_top=”20″ padding_bottom=”20″][/vc_column_inner][vc_column_inner width=”1/2″][vc_single_image image=”2179″ img_size=”large” alignment=”center”][vc_separator style=”blank” padding_top=”5″ padding_bottom=”5″][vc_column_text]To add even more depth as well as some weathering, I mixed up an almost black burnt sienna color, and sprayed areas I wanted to have more shadow. I also applied this as a wash to the channels that I cut earlier with my soldering iron.[/vc_column_text][vc_separator style=”blank” padding_top=”20″ padding_bottom=”20″][/vc_column_inner][/vc_row_inner][vc_row_inner][vc_column_inner width=”1/2″][vc_single_image image=”2184″ img_size=”large” alignment=”center”][vc_separator style=”blank” padding_top=”5″ padding_bottom=”5″][vc_column_text]The final step is to hit the edges and raised areas with a gold paint pen. They can be fickle though, so be careful that it not spurt ink all over your project![/vc_column_text][vc_separator style=”blank” padding_top=”20″ padding_bottom=”20″][/vc_column_inner][vc_column_inner width=”1/2″][vc_single_image image=”2187″ img_size=”large” alignment=”center”][vc_separator style=”blank” padding_top=”5″ padding_bottom=”5″][vc_column_text]For silvery metals I like to sponge on gunmetal and aluminum colored paint using a paper towel or sponge to get a more steel-like appearance.[/vc_column_text][vc_separator style=”blank” padding_top=”20″ padding_bottom=”20″][/vc_column_inner][/vc_row_inner][vc_row_inner][vc_column_inner width=”1/2″][vc_single_image image=”2190″ img_size=”large” alignment=”center”][vc_separator style=”blank” padding_top=”5″ padding_bottom=”5″][vc_column_text]As with the gold areas, I highlight the edges with a silver paint pen, to add some weathering, and also to make the details pop.[/vc_column_text][vc_separator style=”blank” padding_top=”20″ padding_bottom=”20″][/vc_column_inner][vc_column_inner width=”1/2″][vc_single_image image=”2125″ img_size=”large” alignment=”center”][vc_separator style=”blank” padding_top=”5″ padding_bottom=”5″][vc_column_text]The handle was wrapped with leather to hide the PVC pipe, and some details were painted on. And now you’re finished![/vc_column_text][vc_separator style=”blank” padding_top=”20″ padding_bottom=”20″][/vc_column_inner][/vc_row_inner][vc_separator style=”blank” padding_top=”5″ padding_bottom=”5″][/vc_column][/vc_row][vc_row][vc_column]
[vc_column_text]All in all, I’m very happy with how my project tuned out, and I hope you find this useful to make glowing or transparent blades for other projects![/vc_column_text][vc_separator style=”blank” padding_top=”20″ padding_bottom=”20″]
[vc_single_image image=”2124″ img_size=”large” alignment=”center”][/vc_column][/vc_row]


Leave a Comment